|
S2000 Enclosure Installation Instructions
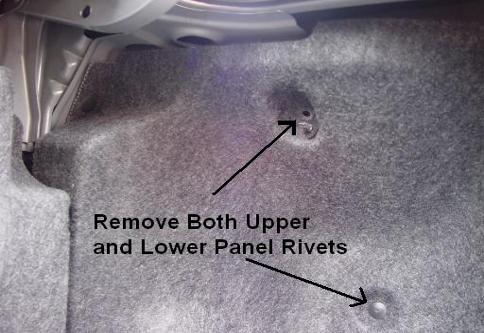
Step 1 – Remove the upper and lower plastic panel rivets (as shown below) so that you can run your speaker wiring behind the panel.
Step 2 – Remove (or pull back) the panel so that you have access to the hole where the upper plastic-rivet was inserted.
Step 3 – Insert the bolt and washer mounting hardware into the upper hole from the back side as shown in the image below. Only install the bolt and nut at this time. Do not mount the strap at this time.
Step 4 – Run your speaker wires and replace your panel. Re-install all mounting hardware with the exception of the upper panel rivet. This is where the mounting strap will be installed.
Step 5 – Place your strap over the bolt followed by the washer and lock-nut. Tighten the lock nut until the strap is held snugly in place (the rubber strap should be slightly compressed and the bolt is completely through the lock nut).
Step 6 – Move your sub enclosure into place and connect the speaker wires to the terminals on the back of the enclosure (respecting correct polarity).
Step 7 – Gently pull the rubber strap up and over the stud that is at the top of the sub enclosure. You can fold the tail of the strap back over itself and tuck it under the lip of the trunk to keep the strap out of the way.
Step 8 – Repeat for other side if installing 2 enclosures.
Step 9 – Follow all instructions for properly setting up your amplifier. Typically you will set your amp (or appropriate channels if using a 4+ channel amplifier) to the Low Pass (LP) setting. A good starting point for the frequency cut-off is 120 Hz – adjustments can be made up or down until the sound is crisp and undistorted – and meets your individual listening preference.
Notes: · It has been noted that on some cars the left (driver) side enclosure may not clear the wire harness that is fastened to the left side trunk hinge. If this is the case – the simplest fix is to remove the white plastic stand-off and use a zip-tie to hold the wire harness closer to the hinge. It is also possible to run the wires on the opposite side of the hinge. When placing your enclosure in place make sure that the speaker wires are not bunched up between the enclosure and the trunk liner/wall. Bunched wires (or a large gauge speaker wire) can cause the enclosure to sit out farther from the wall then designed – potentially causing contact/rubbing with the trunk hinge assembly.
Mounting your sub in the Enclosure For best results you should pre-drill pilot holes and use a dry-wall or fiberboard type screw to mount your subwoofer. Take special care not to puncture your subwoofer (I have done this before and it is both expensive and frustrating) – protect the subwoofer surround and cone material with your hand - as a bandage is less expensive than a new speaker.
Also make sure that you do not use a screw that is so long that it will damage the enclosure. Typically a 1” (or 25mm) long screw will be more than sufficient.
|